Project Overview
This comprehensive vulnerability scanning lab demonstrates hands-on experience with network reconnaissance, port scanning, vulnerability assessment, and security hardening techniques. Using Kali Linux and Windows environments, I performed systematic network discovery, identified open services, analyzed firewall configurations, and implemented security controls to remediate vulnerabilities.
Lab Environment Setup
Target Environment
- Windows Server/Client machine with default configurations
- Network connectivity between Kali Linux and target
- Windows Firewall with default rules enabled
- SMB services running with default settings
Testing Tools
- Kali Linux for penetration testing
- Nmap for network discovery and port scanning
- Nessus for vulnerability assessment
- Windows tools for firewall and service analysis
Step-by-Step Process
Step 1 — Network Verification (Kali)
.png)
Purpose: Verify that the Windows 11 target (192.168.68.71) is reachable over the network before performing scans.
Outcome: All ping requests were successful with 0% packet loss, confirming that the target host is active and communicating on the network.
Technical Details: The ping command sent 4 ICMP echo requests with round-trip times ranging from 0.769 ms to 1.06 ms, demonstrating stable network connectivity between the Kali Linux attacker machine and the Windows 11 target.
Step 2 — Host Discovery (Kali)
.png)
Figure 2 — Nmap host discovery from Kali identifying live devices on the 192.168.68.0/24 network, confirming visibility of the Windows target (192.168.68.71).
Purpose: To identify all active devices on the local subnet (192.168.68.0/24) before performing targeted scans. This ensures that the correct host (192.168.68.71) can be isolated for deeper analysis.
Outcome: Nmap successfully discovered multiple devices across the network, including smart home devices, Apple systems, and the Windows 11 target (192.168.68.71). The scan detected 22 active hosts out of 256 possible IPs, confirming that the target is reachable and active within the subnet.
Step 3 — Port Scanning & Service Enumeration (Kali)
.png)
.png)
.png)
Figure 3 — Nmap port scans from Kali. Broad scan indicates multiple common service ports are filtered (possible firewall). Targeted scans will follow to identify actual service versions and owning processes.
Purpose: Identify open or filtered TCP ports on the Windows target to determine which services are reachable and worth deeper enumeration.
Outcome / Interpretation:
- The host responded to port scans and many well-known service ports (22, 80, 135, 139, 445, 3389, 5985, 5986, etc.) are shown as filtered in the broad scan — this typically indicates a firewall or packet filtering is present.
- Filtered ports mean probe packets were dropped or blocked; it doesn't prove the service isn't running, only that it's not reachable from the scanner without further enumeration or credentialed access.
- These results justify the next steps: targeted service/version scans and mapping ports to Windows processes to confirm which services are listening.
Step 4 — Host Verification & Listening Ports (Windows)
.png)
Figure 4 — netstat output on the Windows target listing listening TCP ports and associated PIDs (used to map ports → processes).
Purpose: Confirm which TCP ports are actually listening on the Windows target and capture the owning PIDs (so we can map services to processes in a later step).
Outcome / Interpretation: The netstat output shows the system is listening on several ports including 135, 445, 5040, 7680 and many ephemeral ports. The right-most column lists process IDs (PIDs) for each listener — this proves the services are locally bound and gives you the IDs to correlate to process names (using Get-Process -Id <pid>). This is the evidence needed to show which services exposed SMB/RPC prior to hardening.
Step 5 — Firewall Analysis & Temporary SMB Test (Windows + Kali)
Purpose: Audit and document the current Windows firewall configuration, then create a temporary inbound rule to allow SMB traffic (TCP 445) for testing. This verifies that the firewall is responsible for blocking SMB connections and demonstrates how enabling the port affects external reachability.
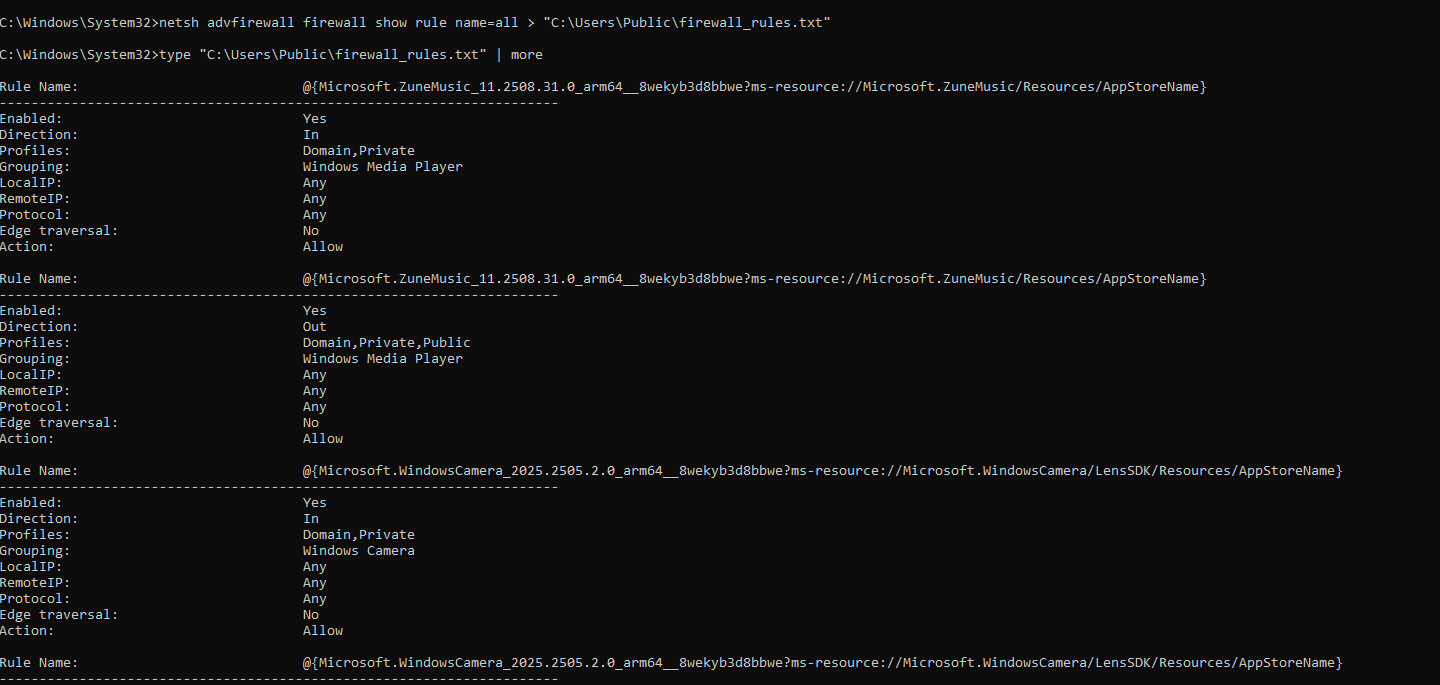
Figure 5.1 — Exported firewall rules (baseline) showing enabled inbound and outbound rules for system apps prior to modification.
5.1 Firewall Rule Enumeration (Windows): Exported and reviewed all firewall rules to establish a baseline before making any changes. The command output lists many built-in and application-specific rules (e.g., Windows Media Player, Camera, Network Discovery).
.png)
Figure 5.2 — Filtered list of active inbound firewall rules showing which profiles (Domain, Private, Public) currently allow inbound connections.
5.2 Enabled Inbound Rules (Windows): Filtered the ruleset to display only active inbound rules. This view highlights services such as Network Discovery, Remote Assistance, and Core Networking, which define how the host communicates within its local domain.
.png)
Figure 5.3 — Temporary inbound rule "Allow SMB Test" created to open TCP 445 for controlled testing.
5.3 Create Temporary SMB Rule (Windows): A temporary inbound rule named "Allow SMB Test" was added to permit TCP traffic on port 445, for controlled validation of external reachability.
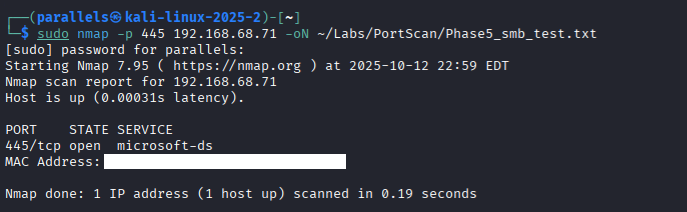
Figure 5.4 — Nmap scan from Kali showing port 445 open (microsoft-ds service) when the temporary Allow SMB rule is active.
5.4 Validate from Kali (Linux Attacker Machine): A targeted Nmap scan was performed from a Kali VM against 192.168.68.71 on port 445. The scan confirmed the port was "open", proving the firewall rule successfully allowed external SMB traffic.

Figure 5.5 — Firewall rule successfully deleted after testing, restoring the default security posture.
5.5 Delete Temporary Rule (Windows): After validation, the 'Allow SMB Test' rule was deleted to restore the system's secure configuration. This returns the firewall to its original hardened state where SMB is blocked from external hosts.
Summary / Key Findings:
- Confirmed that the Windows firewall is the primary control restricting SMB access.
- Verified the effect of enabling/disabling port 445 from an external attacker viewpoint.
- Demonstrated safe, reversible configuration changes as part of the hardening workflow.
Step 6 — Service & Process Verification (Kali + Windows)
Purpose: Correlate identified open ports to specific services and their owning processes on the Windows target. This confirms the exact software exposing network services and helps prioritize hardening efforts.
.png)
Figure 6.1 — Nmap service enumeration from Kali, confirming SMB (port 445) and RPC (port 135) services are running on the Windows target.
6.1 Service Enumeration (Kali): Performed a targeted Nmap scan to enumerate services and versions on the previously identified open ports (135, 445). The scan confirmed that Microsoft Windows RPC (port 135) and Microsoft Windows SMB (port 445) are active, along with other services like HTTP (port 80) and RDP (port 3389).
.png)
Figure 6.2 — Get-Process output on Windows, mapping PIDs to service names (e.g., svchost.exe for RPC and System for SMB).
6.2 Process Mapping (Windows): Used PowerShell's `Get-Process` command to map the PIDs obtained from `netstat` (Step 4) to their corresponding process names. This confirmed that `svchost.exe` is responsible for RPC (port 135) and the `System` process handles SMB (port 445), providing a clear understanding of the underlying services.
Summary / Key Findings:
- Successfully mapped network services to specific processes on the Windows target.
- Confirmed that critical services like SMB and RPC are active and exposed.
- Established a clear link between open ports and the software responsible, guiding subsequent hardening actions.
Step 7 — Vulnerability Scan (Kali)
Purpose: Conduct an Nmap vulnerability scan to identify potential weaknesses or outdated services on the target system.
This step evaluates whether any common ports (135, 139, 445, 5040) expose known vulnerabilities or misconfigurations before and after system hardening.
.png)
Figure 7.1 — Nmap vulnerability scan output confirming that all major Windows service ports are closed and no vulnerabilities are exposed externally.
7.1 Nmap Vulnerability Script Scan: Using Kali Linux, a targeted Nmap vulnerability script (--script vuln) was executed against the Windows host.
The scan focused on SMB-related ports and common service ports associated with Windows systems.
The results show that all scanned ports (135, 139, 445, 5040) were closed, indicating that the system's firewall and SMB hardening measures were successfully preventing external access.
Summary / Key Findings:
- Verified that previously open or filtered ports are now closed post-hardening.
- No active vulnerabilities were detected by the Nmap vulnerability script.
- Confirms effective implementation of prior security measures, including firewall restrictions and SMB protocol hardening.
Step 8 — SMB and Firewall Hardening (Windows + Kali)
Purpose: Enhance the security posture of the Windows host by disabling outdated SMB protocols, enforcing SMB signing, and implementing strict inbound firewall rules.
These steps directly mitigate lateral movement risks, unauthorized network access, and legacy vulnerabilities like EternalBlue (MS17-010).

Figure 8.1 — Export of baseline Windows firewall rules prior to making SMB and port configuration changes.
8.1 Baseline Firewall Export (Windows): Before applying any changes, the existing firewall configuration was exported.
This provided a snapshot of the pre-hardening state and served as a rollback reference if required.
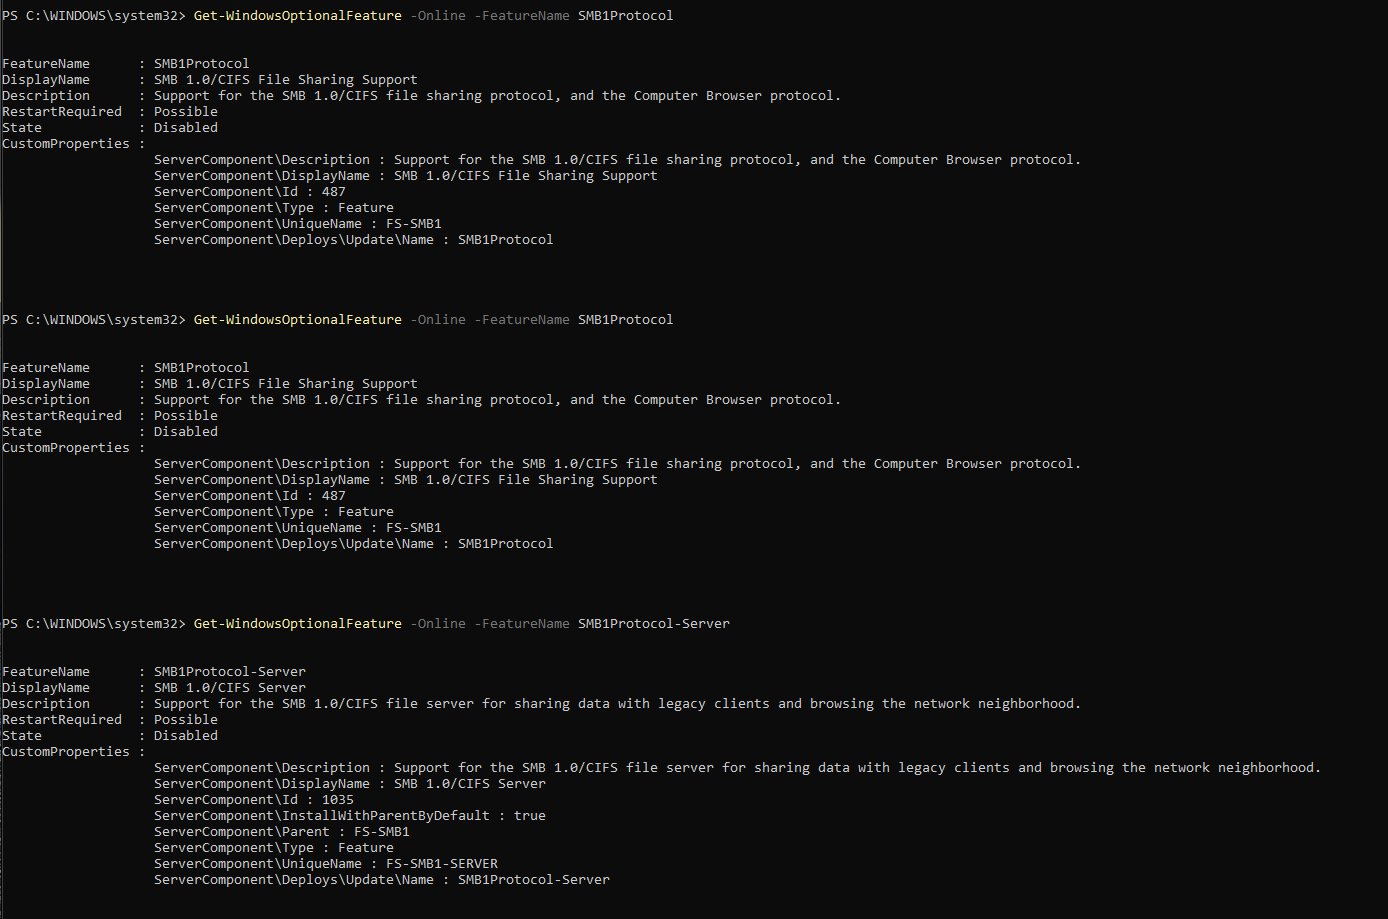
Figure 8.2a — Verification showing SMBv1 features disabled, preventing insecure legacy connections.
8.2 SMB Protocol Hardening (Windows)
Disable SMBv1 Protocol: SMBv1 is a legacy file-sharing protocol with known vulnerabilities.
The command output confirms both SMB1Protocol and SMB1Protocol-Server were disabled system-wide.
Disable SMBv1 Feature and Add Firewall Rule: Re-checked the SMB1 feature status to confirm it remained disabled.
Then, created a new inbound firewall rule named "Block SMB inbound (Lab Harden)" to explicitly block TCP 445 across all profiles, further preventing any inbound SMB attempts.
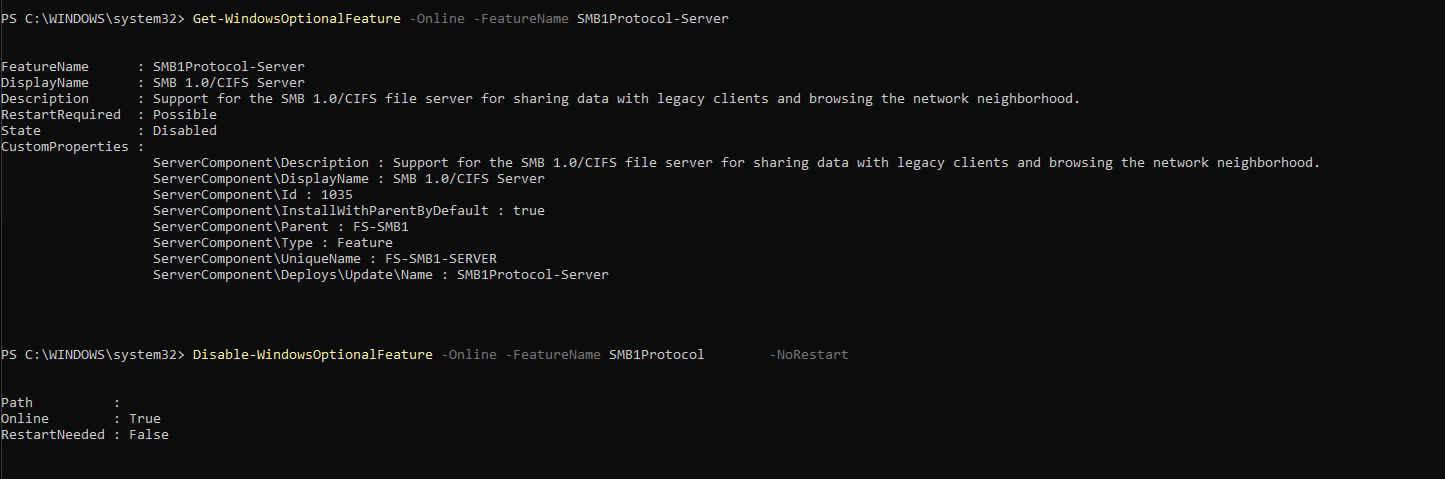
Figure 8.2b — PowerShell commands to create inbound firewall rule blocking SMB (TCP 445) across all profiles.
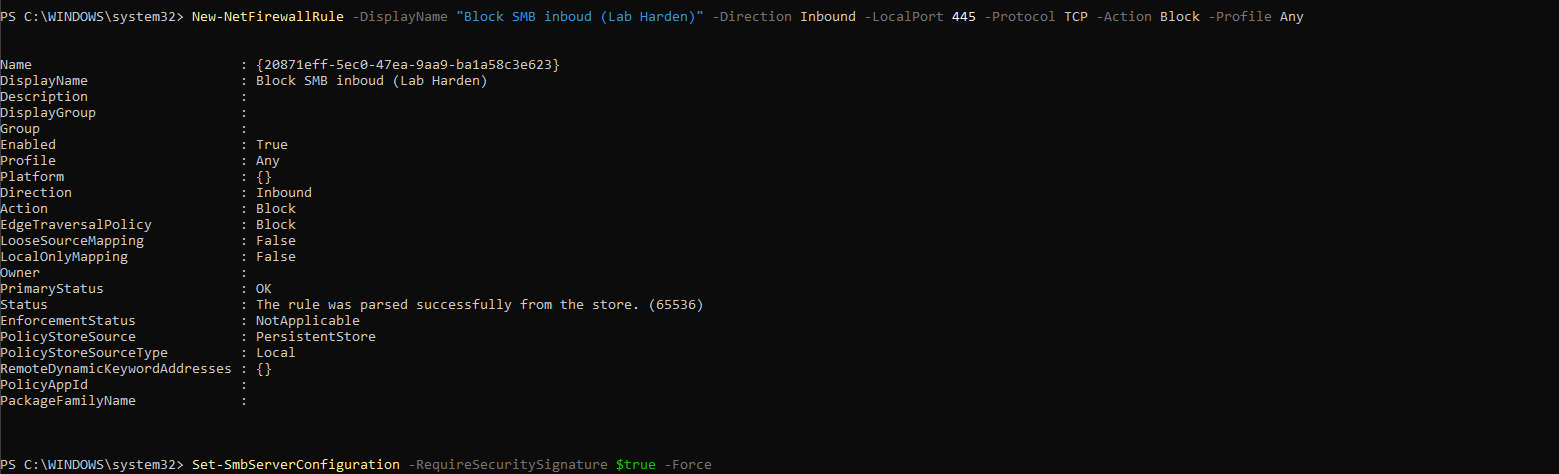
Figure 8.2c — SMB server signing enabled for secure communication validation.
Enable SMB Signing (Server and Client): Enabling SMB signing ensures message integrity and prevents tampering during SMB communication.
Commands were executed to enforce RequireSecuritySignature = True for both the SMB Server and Client configurations.

Figure 8.2d — SMB client signing enforced to ensure authenticated sessions with servers.
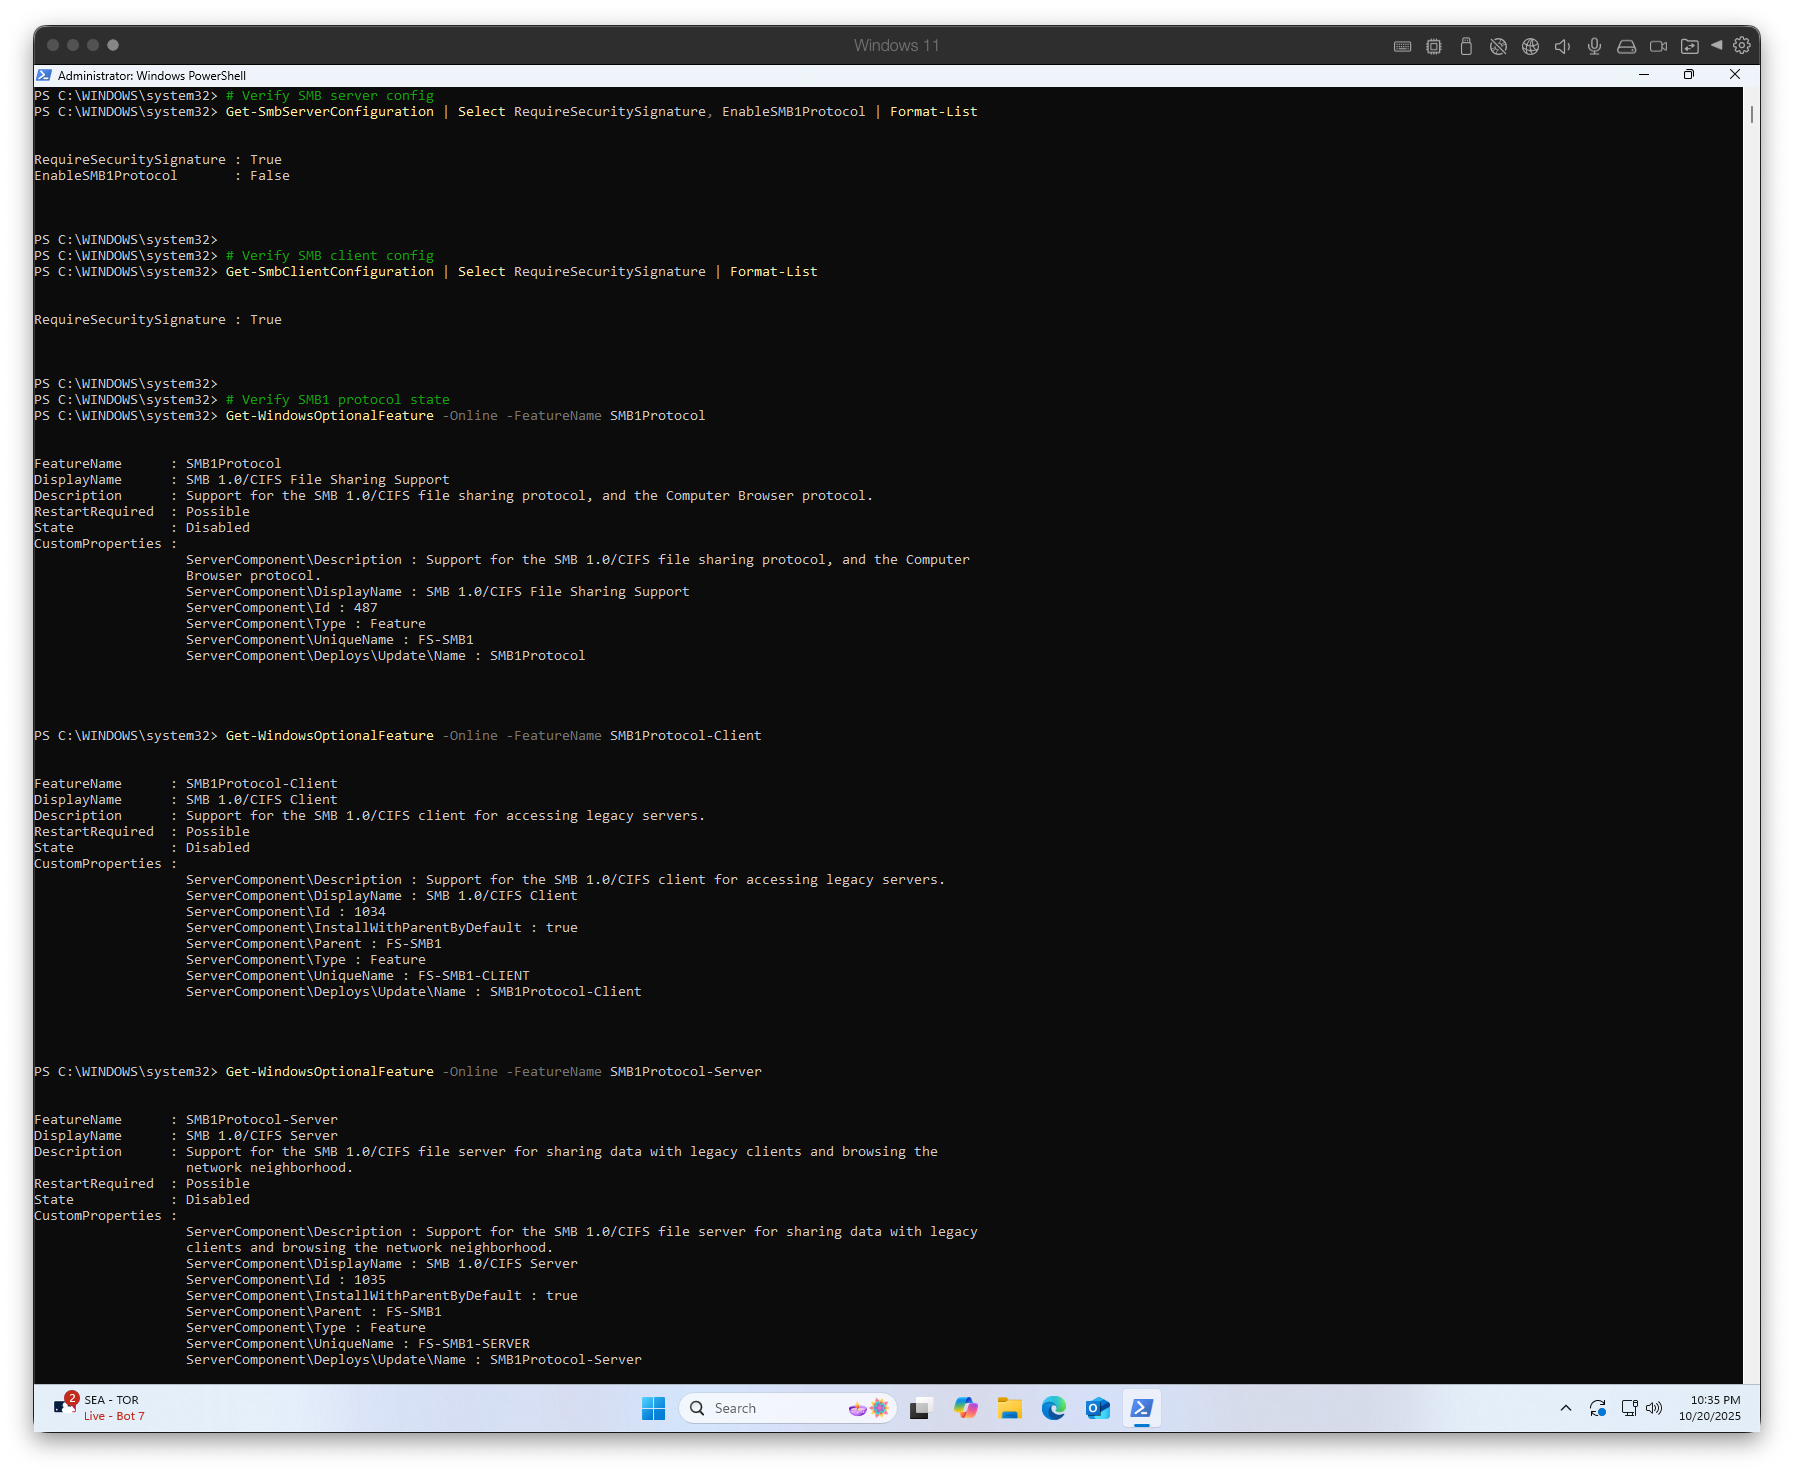
Figure 8.2e — Output confirming SMB hardening: SMBv1 disabled, SMB signing enabled, and secure configuration applied.
Verify SMB Configuration: Post-modification verification confirmed the server's SMB1 protocol disabled, SMB signing enabled, and firewall rule active.
This validated that all SMB-related mitigations were correctly applied and persistent.
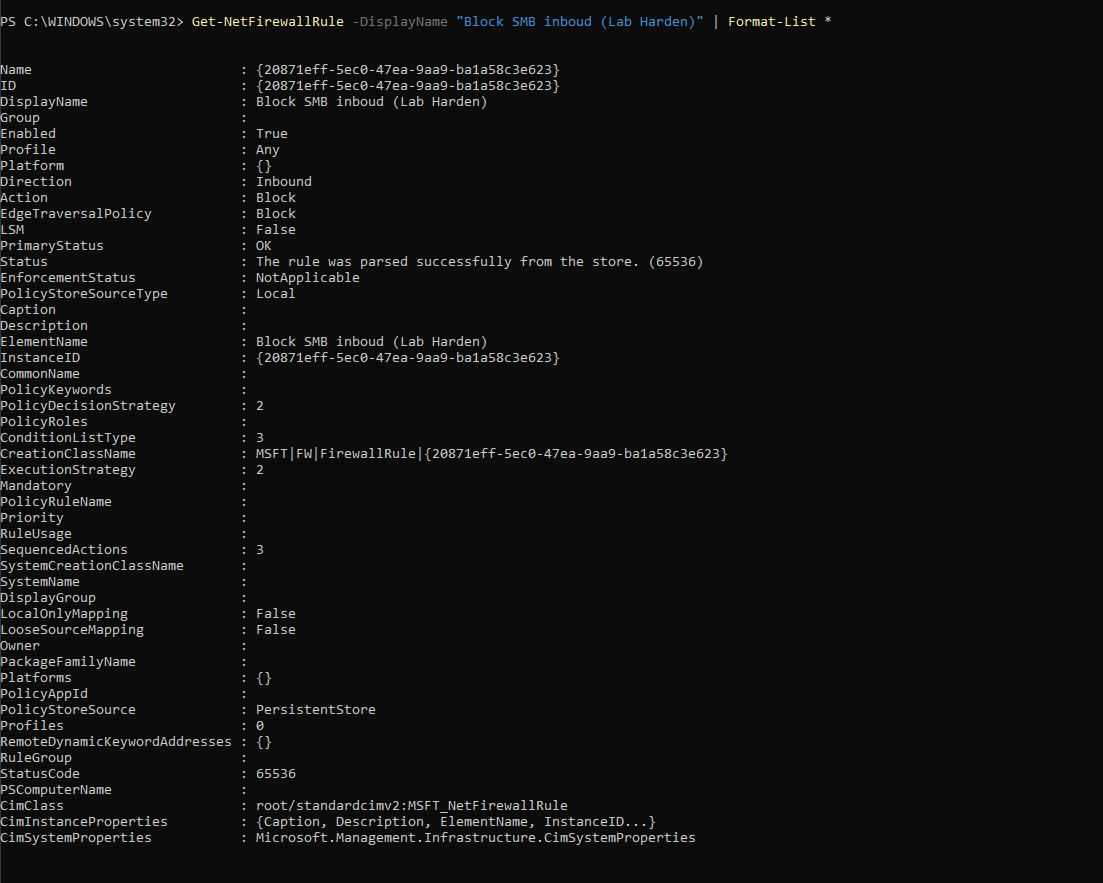
Figure 8.2f — Detailed rule properties confirming inbound SMB traffic is blocked on TCP 445.
Verify Firewall Rule: The firewall rule "Block SMB inbound (Lab Harden)" was reviewed to confirm that it successfully blocked all inbound SMB traffic and was stored persistently within the local policy store.
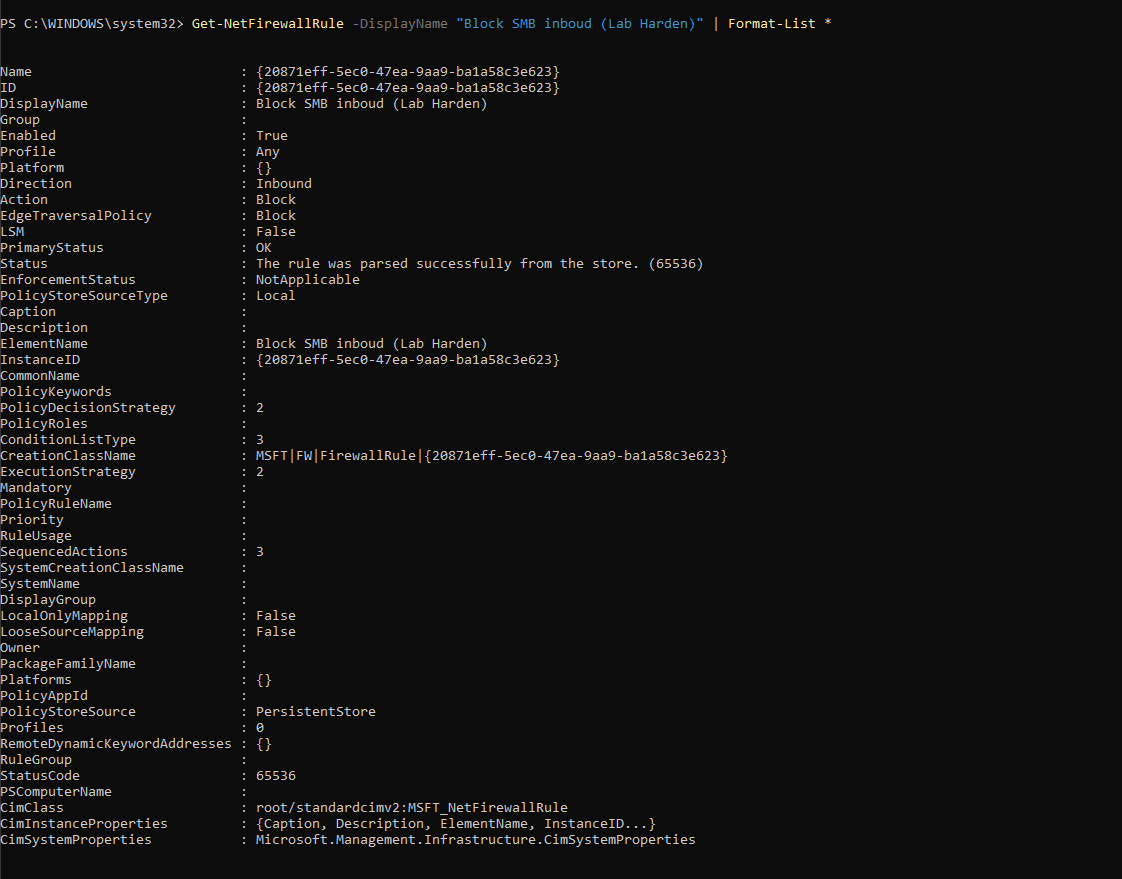
Figure 8.3 — Post-hardening Nmap vulnerability rescan showing all SMB ports closed and no exploitable services exposed.
8.3 Post-Hardening Vulnerability Rescan (Kali): After implementing all hardening measures, another Nmap vulnerability scan was performed from Kali to verify the effectiveness of the changes.
The rescan confirmed that all previously vulnerable or filtered ports were now closed, and no SMB-related vulnerabilities were detected.
Summary / Key Findings:
- Successfully disabled legacy SMBv1 protocol to eliminate EternalBlue and similar attack vectors.
- Enforced SMB signing on both server and client to prevent man-in-the-middle attacks.
- Implemented strict inbound firewall rules blocking TCP 445 to prevent unauthorized SMB access.
- Post-hardening scans validated that all mitigations were effective and persistent.
Step 9 — Stealth Scan Techniques (Kali)
Purpose: Demonstrate advanced Nmap stealth scanning techniques designed to evade detection by firewalls, intrusion detection systems (IDS), and network monitoring tools.
This step explores how attackers use low-profile scanning methods to gather intelligence while minimizing their footprint.
.png)
Figure 9.1 — Nmap stealth scan (SYN scan) demonstrating how attackers can probe systems while avoiding full TCP connections and reducing detection likelihood.
9.1 SYN Stealth Scan: Performed a TCP SYN scan (-sS) against the hardened Windows target to test how the system responds to stealthy reconnaissance attempts.
Unlike a full TCP connect scan, SYN scans send only the initial SYN packet and analyze the response without completing the three-way handshake, making them harder to log and detect.
The scan results confirmed that the hardened firewall configuration successfully blocked or filtered these stealth probes, demonstrating the effectiveness of the implemented security controls.
Summary / Key Findings:
- Demonstrated how stealth scanning techniques can be used to minimize detection.
- Confirmed that the hardened system resists common evasion tactics.
- Highlighted the importance of robust firewall rules and logging to detect and block stealthy reconnaissance attempts.
Key Learnings & Skills Developed
Network Reconnaissance & Scanning
- Host discovery and network mapping with Nmap
- Port scanning methodologies and service enumeration
- Stealth scanning techniques to avoid detection
- Process correlation and service-to-PID mapping
Vulnerability Assessment
- Automated vulnerability scanning and script usage
- Manual verification of identified vulnerabilities
- Risk assessment and prioritization strategies
- Post-remediation validation and retesting
Security Hardening & Remediation
- SMB protocol hardening (disabling SMBv1, enforcing signing)
- Windows Firewall rule creation and management
- Service configuration and security baseline establishment
- Firewall analysis and controlled testing procedures
Documentation & Resources
This comprehensive lab demonstrates practical vulnerability assessment skills essential for cybersecurity professionals. The documentation includes detailed procedures, command examples, and remediation strategies that can be applied in real-world security assessments.